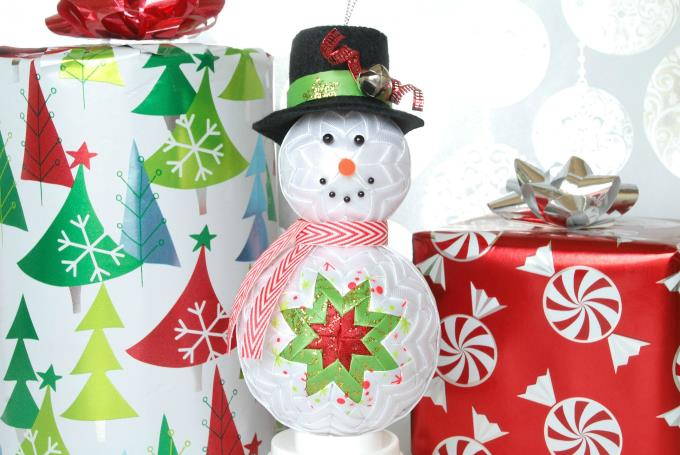
Ribbon Pieces
- Cut out all of the ribbon pieces for the project.
- Red Wired Ribbon – 1” x 15’ Cut the wire edge off and into (10) 1½” pieces. Save the cut off wire edges.
- Green Wired Ribbon – 1” x 15’. Cut the wire edge off and into (16) 1½” pieces. Cut a 5¾” piece with the wire edges on (for the brim of the hat).
- Multicolored ribbon 5/8” x 9’. Cut into (16) 1¼” pieces.
- 2½” x 15’
- Cut into (138) ¾ x 1½” pieces – make sure the 1½” side is along the outer edge of the ribbon (96 pieces for the body; 42 pieces for the head).
- Cut a 1 x 10” strip (to go around the body).
- Cut a 1 x 7½” strip of ribbon (to go around the head).
- Striped ribbon 3/8” x 6″. Cut 9½” long.
Supplies
- 2” Foam ball
- 3” Foam ball
- 2 Boxes applique pins, size 12, ¾” 350 ct.
- 3 Ball point pins, size 20, 1¼”; color 2 pin heads with the black marker
- 5 Ball point pins, size 17, 1-1/16”; color 5 pin heads with the black marker
- 1 Jingle bell
- Black felt
- Tacky glue
- Black permanent ultra fine point marker
- 1 Orange tiny pom pom
- 4” Long toothpick
- Quilt fiberfill
- Ribbon to hang it, 11” long
- Snowman Hat – Pattern
- Rubber bands
- Measuring tape
- Cardstock
- Fabric scissors
- White fabric marking pencil or chalk
- Black and white thread
- Sewing needle
- Yarn needle
Mark the Center Lines
 For both balls (3″ and 2″), wrap two rubber bands around it on opposite sides. Also wrap a rubber band around the center.
IMPORTANT – Use a measuring tape to precisely measure the distance between the crisscrosses on the rubber bands.
On the 3” ball, the distance should be 2-3/8”. Keep maneuvering the rubber bands until they are all exactly the same distance. For the 2” ball, the distance should be 1½”.
Measure each distance twice. The lines MUST be equally spaced apart. Then you will be able to evenly wrap the final ribbon around the sides. If the measurement is not precise, a gap of styrofoam will show through!
With the ultra fine tip marker, trace along both edges of every rubber band to mark the centering lines.
Take the rubber bands off.
NOTE: For the front of the snowman body – complete these steps.
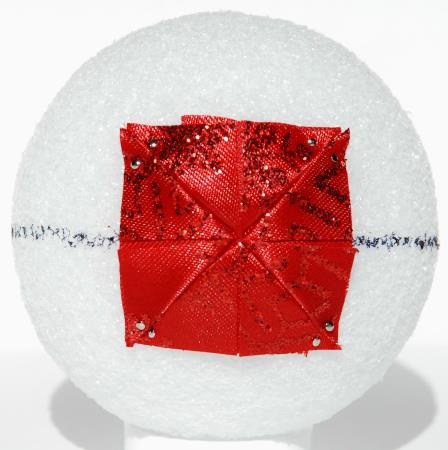
Red Center Star (5 ribbon pieces)
 Pin one triangle of the 1” red ribbon centered across the center equator. (This is just done on each end so no styrofoam shows through the center star.)
Fold another triangle in half to find the center.
Stick an applique pin in the back side of the ribbon in the center – just below the top edge. Pin it a hair below the center of the vertical ribbon. (The back of the ribbon should be facing you.)
 Fold down the top corners of the ribbon so it looks like a triangle. Be sure it hides the top pin. If your pin shows, you have it in too close to the edge of the ribbon. Take it out and repin it.
Press the flaps down flat and pin them at the bottom corners.
Pin another triangle directly across the equator (opposite to the first triangle). Try to get the tips as close as possible.
 Pin 2 more triangles on the sides so they come out from the center. If they aren’t lined up right, something is out of position.
Bottom of the folds – They may need to overlap so no styrofoam shows through.
Spacing Rulers
Cut two pieces of cardstock: ¼ x 1” and ½ x 1” to use as “spacing rulers”. Label each ruler, so you don’t get confused.
Green Star (4 ribbon pieces)
With your “spacing ruler” measure ¼” from the center and down the center of a red triangle.
Pin in 1 green triangle at that spot.
 Do this for 3 more green triangles.
 Then measure ¼” from the center between the center triangles and pin in 1 green triangle.
Pay attention to spacing between triangles.
 Do this for 3 more green triangles.
Multicolored Star (4 ribbon pieces)
 With your “spacing ruler” measure ¼” from the tip of a lower green triangle and down the center.
Pin in a multicolored triangle at that spot. Follow the lines that the triangles are making toward the center – to help keep everything lined up.
 Do this for 3 more multicolored triangles.
Then measure ¼” from the tip of the upper green triangle and down the center and pin in a multicolored triangle.
 Do this for 3 more multicolored triangles.
White Star (48 ribbon pieces)
This thick white ribbon frays easily. When you cut this wide white ribbon there was a natural edge and the edge you cut – it’s important that you pin in the side of the ribbon that was along the natural edge – not the sides that were cut.
 Row 1. Pin 8 white triangles a hair below right where the two multicolored triangles meet.
Row 2. Then measure ¼” from the tip of a multicolored triangle down the center and pin one white triangle there. Pin 7 more white triangles.
 Rows 3, 4, 5, 6. Create four more rows of white triangles – the same way as the first two rows were done.
Pin 8 white triangles between where the large white triangles meet.
Pin 8 more ¼” from the tip of the large white triangles down the center.
Pin 8 white triangles between where the large white triangles meet.
Pin 8 more ¼” from the tip of the large white triangles down the center.

NOTE: For the back of the snowman body – repeat steps for the Red Star, Green Star, Multicolor Star, and White Star.
Strip Around the Body
Using the 1 x 10” white strip of ribbon, fold in ¼” on each long side toward the back of the ribbon to hide the raw edges. This should make the front of the ribbon ½” wide.
Wrap it around the center to see if there are any frayed ends or edges that will stick out – trim them off.

Pin it at the top.
Then tightly wrap it around the body covering the pins and raw edges of the triangles.
Fold the end under ½” so the raw edge doesn’t show and pin it on each corner of the ribbon.
